On this page
What is on the canvas
In pencil mode, the app shows the computer screen. You can put these controls on it:
| Control | Where it is | What it does |
|---|---|---|
| App toolbar | A column on the left edge of the screen | Shortcut buttons for the app that is in front on your computer. Ilopad selects the buttons for you. |
| Buttons | Where you put them | Your own shortcut buttons. One tap can send one or more key combinations. |
| Overlays | Where you put them | A live copy of one area of the computer screen, for example a color palette. It stays in place when you zoom or move the view. |
| Templates | The Templates list | A saved set of your buttons and overlays. |
The pencil mode bar at the top of the screen, the pencil gestures and the pressure settings are in Pencil mode.
The app toolbar
The app toolbar is a column of shortcut buttons on the left edge of the screen. The name of the app that is in front on your computer is at the top of the column. Each button shows a word, for example Brush, Eraser or Undo.
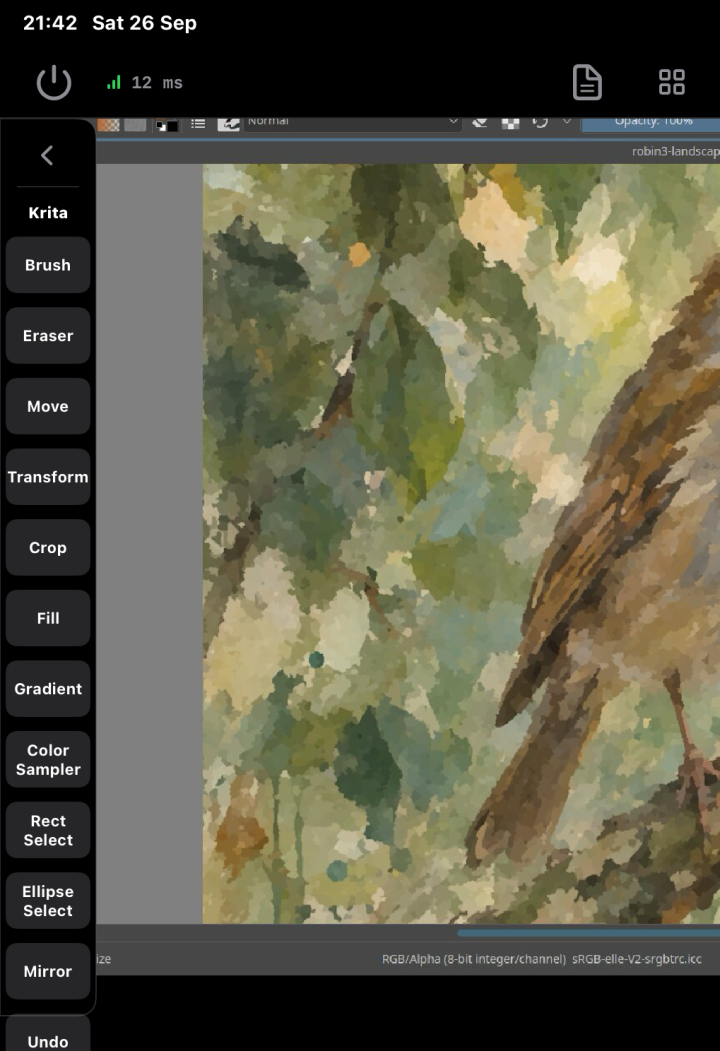
Use a shortcut
- On the computer, click the window of your drawing app. The app comes to the front.
- On the iPad, look at the top of the app toolbar. Make sure that it shows the name of your app.
- Tap a button in the app toolbar. The button shows the accent color for a moment, and the app on the computer receives the shortcut.
When a different app comes to the front on the computer, the app toolbar changes to the buttons for that app. You do not have to do anything.
If an app has more buttons than the screen can show, scroll the column up or down.
Shortcuts on each operating system
The app toolbar sends the correct shortcut for the operating system of your computer. A shortcut that uses Ctrl on Windows and Linux uses Command on a Mac. For example, in Krita, Transform sends Ctrl+T on Windows and Linux, and Command+T on a Mac.
Some apps use a different key combination on each operating system. The app toolbar also knows these. For example, in Goodnotes and MediBang Paint, Redo sends Ctrl+Y on Windows and Command+Shift+Z on a Mac.
Hide and show the app toolbar
- To hide the app toolbar, tap the arrow at the top of the column (Hide app toolbar). A small tab with an arrow stays on the left edge.
- To show the app toolbar again, tap the tab (Show app toolbar).
Ilopad remembers your choice. The app toolbar stays hidden for all apps until you show it again.
When Ilopad does not know the app
If Ilopad does not know the app in front, the app toolbar shows Common at the top. It has seven buttons that most apps use: Undo, Redo, Cut, Copy, Paste, Select All and Save. At the bottom of the column is Set toolbar for this app.
If your app is a version of an app that Ilopad knows, you can tell Ilopad which one it is:
- Tap Set toolbar for this app. The Set Toolbar list opens.
- To find the app faster, type its name in Search apps.
- Tap the app. The app toolbar shows the buttons for that app.
Ilopad remembers your choice for this app.
Change the toolbar for an app
If the app toolbar shows the buttons for the wrong app, tap Change toolbar at the bottom of the column. Then tap the correct app in the Set Toolbar list.
Turn off the app toolbar for one app
You can stop the app toolbar for an app that is not a drawing app, for example a web browser.
- Bring the app to the front on the computer.
- Tap Set toolbar for this app or Change toolbar.
- Tap Not a Drawing App.
When this app is in front, the app toolbar and its tab do not show.
Apps that the app toolbar knows
Adobe Fresco, Adobe Illustrator, Adobe Photoshop, Affinity Designer 2, Affinity Photo 2, Apple Freeform, Apple Notes, ArtRage, AutoCAD, Blender, Canva, Clip Studio Paint, Concepts, DaVinci Resolve, Final Cut Pro, FlipaClip, GIMP, Goodnotes, ibisPaint, Inkscape, Krita, Linearity Curve, Linearity Move, LiquidText, LumaFusion, MarginNote, MediBang Paint, Microsoft OneNote, Microsoft Whiteboard, Miro, Morpholio Trace, Nebo, Nomad Sculpt, Notability, Noteful, PDF Expert, Pencil Planner, Photomator, Pixelmator Pro, Sculptura 2, Shapr3D, SketchBook, SketchUp, StaffPad, Symphony Pro 6, uMake, Xodo, ZBrush and Zinnia.
The app toolbar must know which app is in front on the computer. The server gets this information on Windows, on macOS, and on Linux with X11, GNOME, KDE Plasma, Sway or Hyprland. On a different Linux desktop, the app toolbar can fail to show.
Edit mode
You add, move and change your buttons and overlays in edit mode.
- In the pencil mode bar, tap Edit buttons (the grid icon). The icon shows the accent color.
- Below the icon, two more controls show: Add button (a square with the letter b) and Add overlay (the layers icon).
- When you are done, tap Edit buttons again.
In edit mode:
- Your buttons do not send shortcuts. A tap on a button selects it.
- The pencil mode bar stays on the screen.
- The keyboard, Mouse emulation and Pan the remote screen are not available.
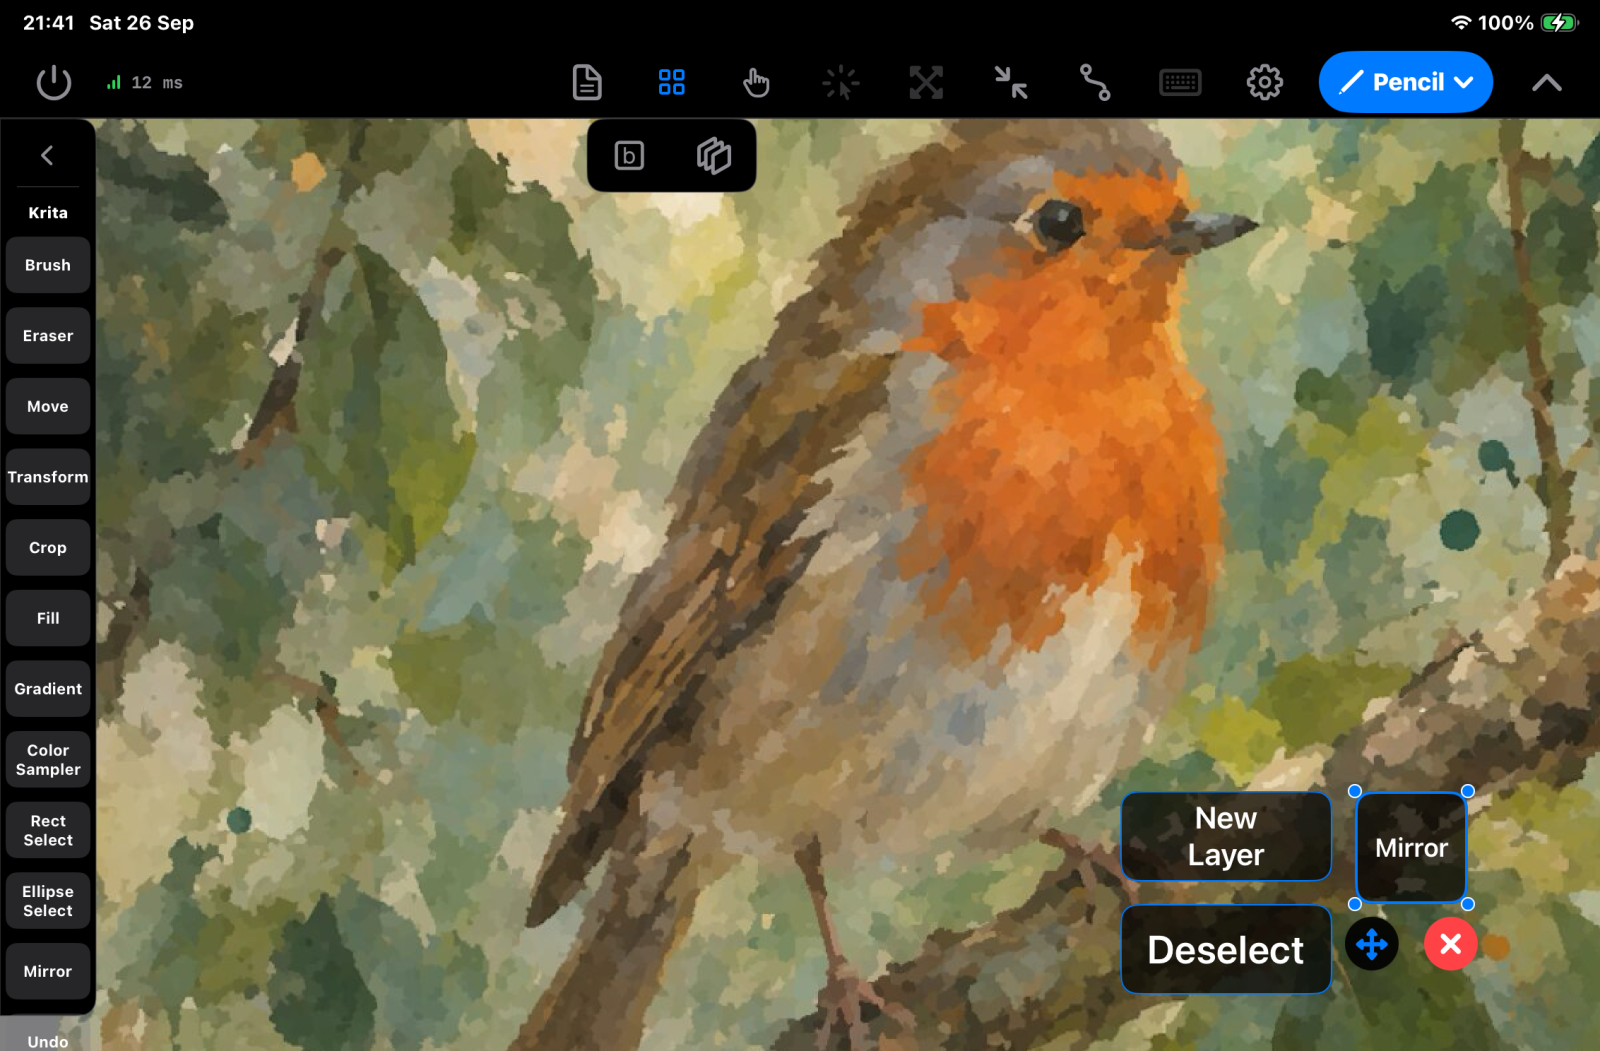
Your own buttons
A button sends key combinations to the computer when you tap it. You give it a name, and you put it where you want on the screen.
What a button can do
- Send a key or a key combination. For example B, or Ctrl+Shift+E. Ilopad presses the keys in order and then releases them.
- Send a sequence. One tap can send several key combinations, one after the other. For example: flatten the image, then save it.
- Do the next step on each tap. For example, the first tap selects the brush, the second tap selects the eraser, and the third tap selects the brush again.
A button sends keys only. It cannot click the mouse, type text or hold a key down while you touch it.
A button sends the keys exactly as you set them. It does not change Ctrl to Command on a Mac, as the app toolbar does. If you use Ilopad with a Mac and with a Windows or Linux computer, make a different template for each type of computer.
Add a button
- Tap Edit buttons.
- Tap Add button. The New Button editor opens.
- In Button name, type a short name. The name shows on the button.
- Tap Add Action. The Custom Shortcut keyboard opens.
- Tap the modifiers and the key that you want. See The Custom Shortcut keyboard.
- Tap Add Keys.
- To add more actions, do steps 4 to 6 again.
- Set each action to Stop or Continue. See Stop and Continue.
- Tap Save.
The new button shows near the upper-left corner of the drawing area, and it is selected. Drag it to the position that you want.
Use a button
- Make sure that edit mode is off.
- Tap the button. The button shows the accent color while you touch it.
Ilopad sends the keys when you lift your finger or the pencil. If you slide off the button before you lift, the button sends nothing. If Haptic Feedback is on in the app settings, you also feel a tap.
A button with more than one stage shows a number in its lower-right corner. The number is the stage that the next tap sends. The count starts at 1 again each time the template loads.
Move, resize, change and delete a button
Do these in edit mode.
| To do this | Do this |
|---|---|
| Select a button | Tap the button. A handle shows on each corner, and a row of controls shows below the button. |
| Move a button | Drag the button. For a small button, drag the move handle (four arrows) below it. When the button is in line with a different button, a line shows and the button snaps into position. |
| Resize a button | Drag a corner handle. A button cannot be smaller than 44 by 44 points. |
| Change a button | Tap the selected button again. The Edit Button editor opens. |
| Delete a button | Tap the red X below the selected button. In the Delete button message, tap Delete. |
| Clear the selection | Tap an empty area of the screen. |
The button editor
The editor has the title New Button when you add a button, and Edit Button when you change one.
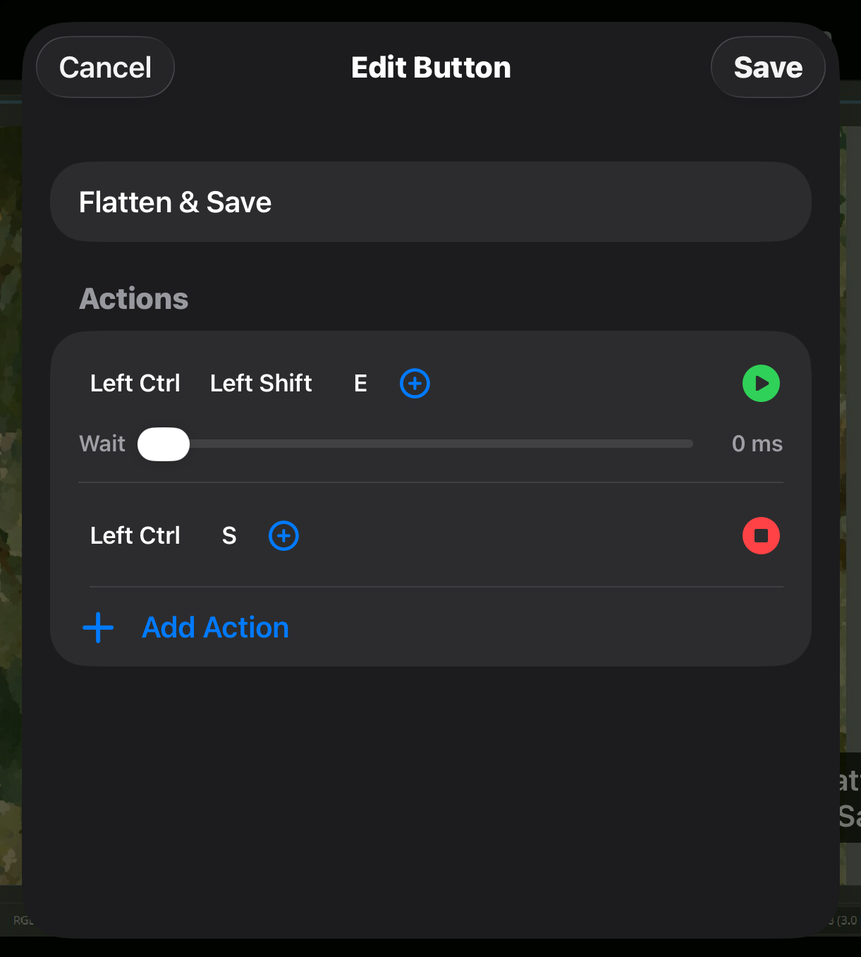
| Item | What it does |
|---|---|
| Button name | The text on the button. If you leave it empty, the name is Button. |
| Actions | The list of actions. Each row is one action. One action sends one key combination. |
| Key names in a row, for example Left Ctrl or E | The keys of that action. Tap a key name to remove that key. |
| Plus button in a row (Add key) | Opens the Custom Shortcut keyboard, and adds the keys that you select to this action. |
| Red stop icon or green play icon (Action mode) | Stop or Continue. Tap the icon to change it. See Stop and Continue. |
| Wait slider | Only on an action that is set to Continue. The time between this action and the next action, from 0 ms to 5 s. The value shows at the end of the slider. See Wait between actions. |
| Add Action | Adds an action at the end of the list and opens the Custom Shortcut keyboard. A new action is set to Stop. If you close the keyboard and add no keys, Ilopad removes the new action. |
| Cancel | Closes the editor and keeps the button as it was. |
| Save | Saves the button. |
To delete an action, swipe left on its row, then tap Delete. You cannot change the order of the actions. To put them in a different order, delete them and add them again.
Stop and Continue
A tap runs the actions in the list, in order, until it gets to an action that is set to Stop. The next tap starts at the action after that one. After the last Stop action, the next tap starts again at the top of the list. Each group of actions that ends with Stop is one stage.
| Setting | Icon | Result |
|---|---|---|
| Stop | Red square in a circle | The tap ends after this action. |
| Continue | Green triangle in a circle | The next action runs in the same tap, after the time on the Wait slider. At 0 ms, it runs immediately. |
Two examples for Krita on Windows:
| Button | Actions | Result |
|---|---|---|
| Flatten and save | 1. Ctrl+Shift+E, Continue 2. Ctrl+S, Stop | Each tap flattens the image and then saves it. |
| Brush or eraser | 1. B, Stop 2. E, Stop | The first tap sends B. The second tap sends E. The third tap sends B again. |
Wait between actions
Some apps need time before they can accept the next shortcut, for example while a dialog opens. To give the app that time, set the action before it to Continue and move its Wait slider.
- From 0 ms to 1 s, the slider moves in steps of 10 ms.
- From 1 s to 5 s, the slider moves in steps of 0.1 s.
- An action that is set to Stop has no Wait slider, because no action comes after it in the same tap. If you set the action to Continue again, the slider shows the time that you set before.
- If you tap the button again during a wait, the next stage runs when the wait and the rest of the first stage are done.
- The computer does the timing, not the network. The app sends the whole stage in one message, so the times do not change on a slow Wi-Fi network, and a stage never arrives in part.
Example for Krita on Windows: a button Save and close with the actions Ctrl+S, Continue, Wait 500 ms, then Ctrl+W, Stop. Each tap saves the image, waits half a second, and closes it.
When you tap Save, the editor checks the button. If there is a problem, a Validation error message tells you what to correct:
- Add at least one action: the list is empty.
- Every action must have at least one key: an action has no keys.
- At least one action must be set to stop: all actions are set to Continue.
- Too many keys before one stop action: the actions of one stage are too long to send together. Set an action in the middle to Stop, or remove keys.
The Custom Shortcut keyboard
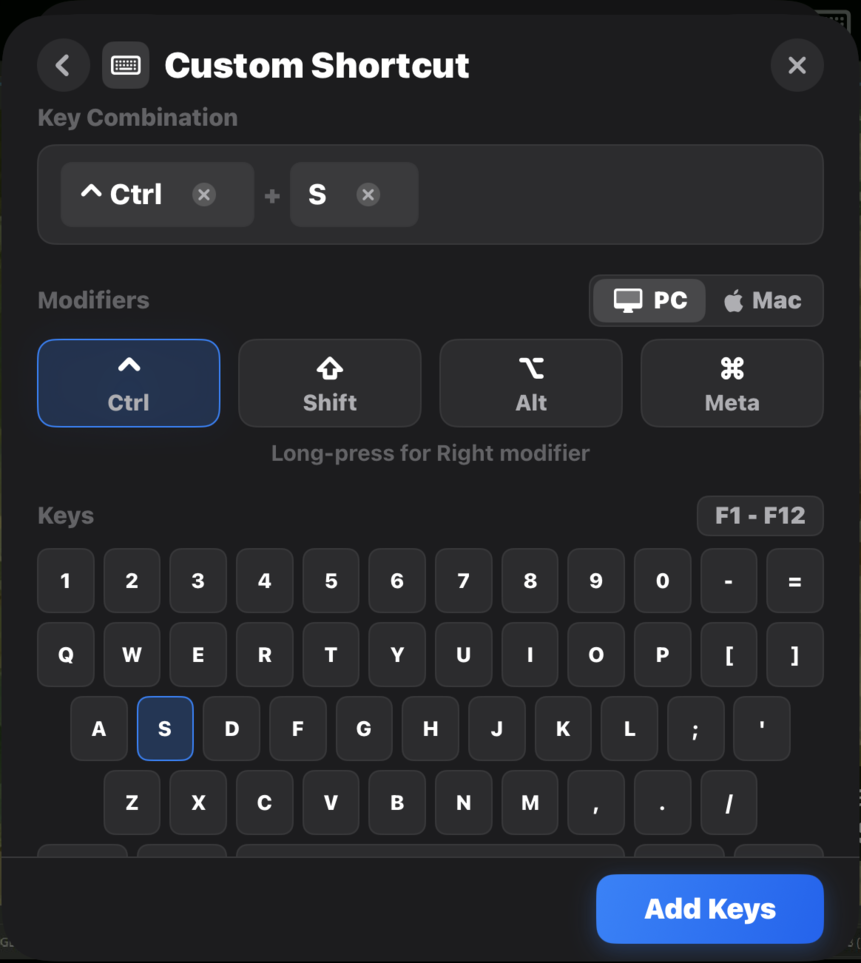
| Item | What it does |
|---|---|
| Key Combination | Shows the modifiers and the key that you selected. Tap the X on a key to remove it. |
| Modifiers | Tap Ctrl, Shift, Alt or Meta to select it. Tap it again to clear it. You can select more than one. |
| Right-hand modifier | Select the modifier, then touch and hold it. An R shows on it, and the button sends the right-hand key. Touch and hold again to go back to the left-hand key. |
| PC and Mac | Changes the names on the modifier keys only. It does not change the keys that the button sends. |
| Keys | Letters, numbers, symbols, Esc, Tab, Space, Enter and Backspace. Below them are Insert, Home, PgUp, Delete, End, PgDn and the arrow keys. When you select Shift, the keys show their shifted symbols. |
| F1 - F12 | Shows the function keys in place of the number row. Tap it again to show the numbers. |
| Add Keys | Adds the keys to the action and closes the keyboard. |
| Back and Close | The arrow and the X at the top. They close the keyboard and add nothing. |
On an iPad, you select one key and its modifiers each time. To add one more key to the same action, tap the plus button in the action row. On an iPhone, you can select several keys at one time. On an iPhone, the symbol keys are in a row below the letters.
This table shows what each modifier sends. Select the modifiers with the PC names.
| Modifier (PC name) | Name in the action row | Windows | macOS | Linux |
|---|---|---|---|---|
| Ctrl | Left Ctrl | Ctrl | Control | Ctrl |
| Shift | Left Shift | Shift | Shift | Shift |
| Alt | Left Alt | Alt | Option | Alt |
| Meta | Left Meta | Windows key | Command | Super |
For example, to send Command+S to a Mac, select Meta and S.
Overlays
An overlay is a live copy of one area of the computer screen. It stays at the same place on the iPad when you zoom, move or turn the view. Use it to keep a color palette, a brush list or a layers panel in view while you work on a detail of your drawing.
You can draw and tap on an overlay. Ilopad sends the pencil to the area of the computer screen that the overlay shows. For example, tap a color in an overlay of the palette to select that color.
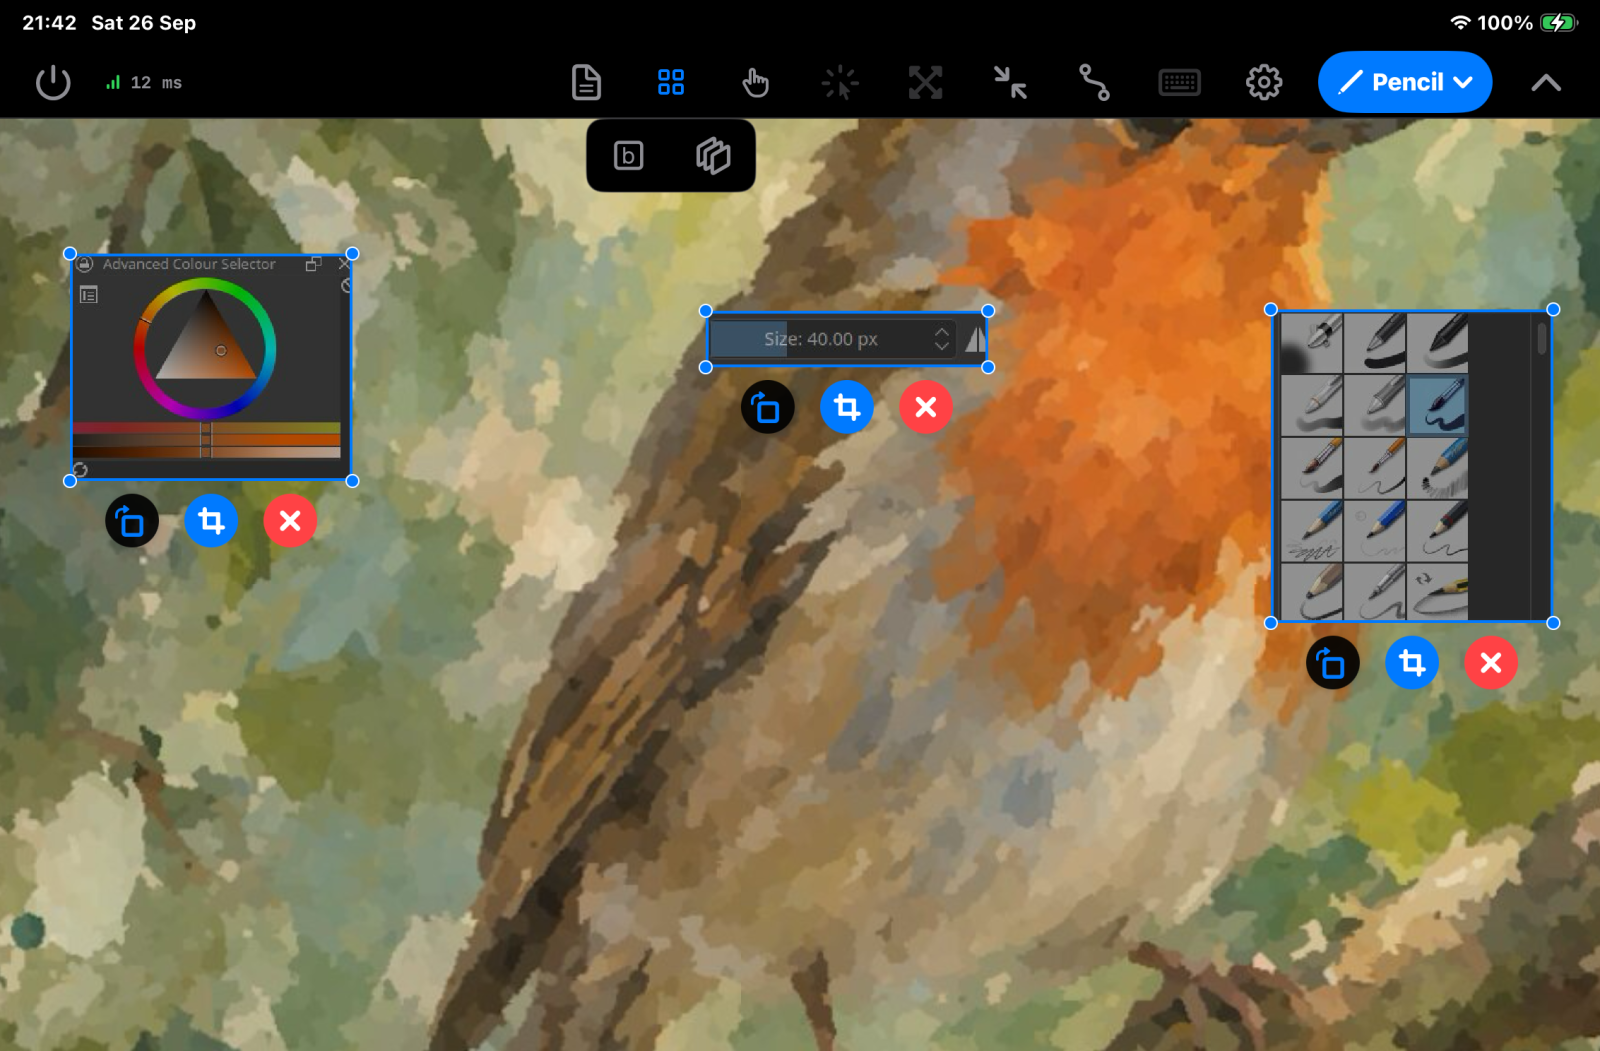
Add an overlay
- Zoom and move the view until you can see the area that you want to copy.
- Tap Edit buttons.
- Tap Add overlay. The screen becomes darker, and the text Drag to select a screen region shows.
- Drag across the area that you want. A rectangle with a dashed border shows.
- To adjust the rectangle, drag its corners. To move it, drag its center.
- Tap the check mark (Accept selection).
The overlay shows in the center of the screen. Edit mode is on, thus you can move and resize the overlay immediately.
To stop without an overlay, tap the X (Cancel selection).
These messages can show:
| Message | What to do |
|---|---|
| Waiting for the computer's screen | The app has not received the computer screen yet. Wait until the screen shows. |
| No screen to select from | The same cause. Wait for the screen, then draw the area again. |
| Selection is off the screen | The rectangle is in the black area around the computer screen. Move it onto the screen, then tap the check mark again. |
| Maximum overlays reached | You can have 7 overlays. Delete one before you add one more. |
Change an overlay
In edit mode, each overlay shows a border, a handle on each corner and a row of controls.
| To do this | Do this |
|---|---|
| Move an overlay | Drag the overlay. For a small overlay, drag the move handle (four arrows) in its row of controls. |
| Resize an overlay | Drag a corner handle. The overlay keeps its shape. It cannot be larger than 70% of the drawing area. |
| Turn an overlay | Drag the turn handle (Turn overlay, the first control in the row). Or turn two fingers on the overlay. |
| Turn it by a quarter | Tap the turn handle. The overlay turns 90 degrees clockwise. |
| Make it straight again | Tap Reset rotation. This control shows only after you turn the overlay. |
| Copy a different area | Tap the crop button (Adjust overlay region). Select the new area and tap the check mark. The overlay keeps its size on the iPad. |
| Delete an overlay | Tap the red X. In the Delete overlay message, tap Delete. |
Show and hide the overlays
A pencil gesture can hide all overlays and show them again. By default, a squeeze of an Apple Pencil Pro does this (the action Toggle Overlay). See Double tap and squeeze to set the gestures. While the overlays are hidden, the pencil draws on the screen below them. When you tap Add overlay, the hidden overlays show again.
Templates
A template is a saved set of buttons and overlays. Make one template for each app or for each type of work, and change between them.
To open the list, tap Templates (the document icon) in the pencil mode bar. If the pencil mode bar is narrow, for example on an iPhone, Templates is in the More controls menu.
Save a new template
- Tap Templates.
- Tap Save As…. The Save Template sheet opens.
- In Template name, type a name.
- Optional: turn on Use for and the name of the app in front. The template then loads each time that app comes to the front.
- Tap Save.
Save changes to the current template
- Tap Templates.
- Tap Overwrite and the name of the template.
Load a template
- Tap Templates.
- Tap the name of the template. A check mark shows next to the template that is loaded.
If you have changes that you did not save, the Unsaved changes message shows. Tap Discard to load the template and lose the changes. Tap Cancel to keep the changes.
Rename or delete a template
- Tap Templates.
- Swipe left on the name of the template.
- Tap Rename or Delete.
- Type the new name and tap Rename, or tap Delete in the Delete template message.
Load a template automatically for an app
Ilopad can load a template each time a specific app comes to the front on the computer.
- Bring the app to the front on the computer.
- Tap Templates. The first section is Default for and the name of the app.
- Tap Opens Automatically.
- Tap the template. To stop the automatic load, tap None.
When the app comes to the front, Ilopad loads the template. A label with the name of the template and the name of the app shows at the top of the screen for a short time. In the Templates list, a label next to a template shows the app that loads it, or the number of apps.
If you have changes that you did not save, Ilopad asks first, for example Load "Inking" for Krita? Tap Load or Not Now.
If you select a template by hand, Ilopad does not replace it automatically for that app until you leave pencil mode.
Go back to the default
- Buttons and overlays. By default, pencil mode has no buttons and no overlays. To get an empty screen, tap Templates, then tap (No Template). Your saved templates do not change.
- App toolbar. By default, Ilopad selects the buttons for the app in front. If you selected the wrong app, tap Change toolbar and select the correct app. Ilopad has no control that goes back to the automatic selection.